
This guide walks you through installing and setting up a smart home energy monitor. It is suitable for beginners interested in monitoring their energy use to save money and reduce environmental impact. The process involves physical installation and app setup, taking approximately 30 to 60 minutes.

Emporia Vue 3 Home Energy Monitor – Real-Time Electricity Usage & Solar Monitoring
- ✔ Certification: UL Listed, CE Listed
- ✔ Installation: Circuit panel with clamp-on sensors
- ✔ Supported Systems: Single phase, split phase, 2-wire, 3-wire, 3-phase, 4-wire Wye

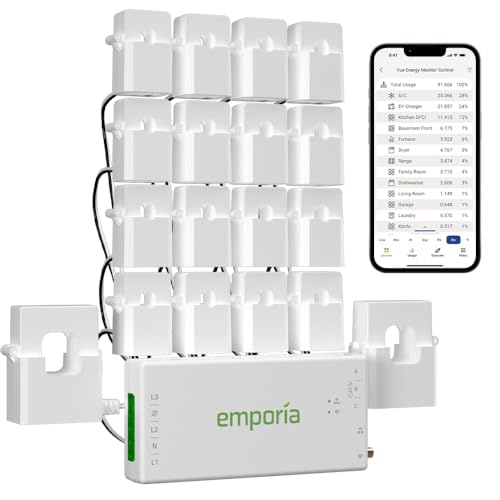
Smart Home Energy Monitor with 16 50A Circuit Sensors, Real-Time Power Usage & Cost Tracking, Compatible with Home Assistant
- ✔ Sensors: 16 50A sensors
- ✔ Supported Voltages: Single-phase up to 240VAC, three-phase up to 415Y/240VAC
- ✔ Connectivity: WiFi 2.4GHz, MQTT, LAN

Refoss Smart Home Energy Monitor with Open API & Web UI
- ✔ Accuracy: ±1% (200A: 2–200A; 60A: 1–60A)
- ✔ Data Storage: Up to 5 years
- ✔ Installation: Clamp-on, supports 2 main circuits and 16 branch sensors
Difficulty: Beginner | Time: 30-60 minutes
What You’ll Need
Tools & Materials:
- Screwdriver
- Wire cutters/strippers (if required)
- Smartphone or tablet
Knowledge:
- Basic understanding of household electrical systems
- Familiarity with installing small electronic devices
Ensure your home’s main power is safely accessible and turn off the circuit breaker before beginning installation. Read the energy monitor’s manual for specific wiring instructions.
Emporia Vue 3 Home Energy Monitor - Smart Home Automation Module and Real Time Electricity Usage Monitor, Power Consumption Meter, Solar and Net Metering for UL Certified Safe Energy Monitoring
SAFETY YOU CAN TRUST WITH UL CERTIFICATION: With Emporia Energy, your home energy monitoring is safe, reliable, and...
As an affiliate, we earn on qualifying purchases.
Emporia Vue 3 Home Energy Monitor – Real-Time Electricity Usage & Solar Monitoring
The Emporia Vue 3 stands out for its comprehensive approach to energy tracking, especially for homeowners with solar panels. Its UL and CE certification assure safety and reliability, while the support for solar and net metering makes it ideal for those looking to optimize renewable energy use. The device includes 16 sensors, enabling detailed monitoring of critical loads and energy flows. However, it relies on WiFi and internet connectivity for full functionality, which could be a limitation if your network is unstable. Compared to other options, it provides the most detailed data and integration potential, but at the cost of requiring a stable internet connection and additional sensors for three-phase systems.
Pros:
- UL and CE certified for safety and reliability
- Supports detailed real-time energy and solar monitoring
- Includes 16 sensors for critical load tracking
- Compatible with various smart home devices
Cons:
- Requires WiFi and internet for full functionality
- Additional sensors needed for 3-phase systems (sold separately)
Best for: Homeowners with solar panels and advanced energy management needs
Not ideal for: Users seeking a simple, plug-and-play device without internet dependency
Bottom line: A robust, feature-rich monitor perfect for solar owners who want detailed data and smart integration, provided their internet is reliable.
“A robust, feature-rich monitor perfect for solar owners who want detailed data and smart integration, provided their internet is reliable.”

Smart Home Energy Monitor with 16 50A Circuit Level Sensors, Real-Time Power Usage & Electricity Cost Tracking, Ideal for Rental Homes & Shared Apartments, App History, Compatible with Home Assistant
⚡ EASY INSTALLATION: Installs in circuit panel of most homes with clamp-on sensors. Supports single-phase up to 240VAC...
As an affiliate, we earn on qualifying purchases.
Smart Home Energy Monitor with 16 50A Circuit Sensors, Real-Time Power Usage & Cost Tracking, Compatible with Home Assistant
This monitor is designed for users who prioritize local data management and device customization. It installs easily with clamp-on sensors and supports multiple circuits and phases, making it versatile for various home configurations. Its support for WiFi, MQTT, and LAN allows for integration with platforms like Home Assistant, ideal for DIY enthusiasts and rental properties. However, it requires some technical setup for MQTT and Home Assistant, which might be a barrier for less experienced users. Compared to the Emporia Vue 3, it offers more control over data privacy and local operation but lacks the advanced solar monitoring features.
Pros:
- Easy to install with clamp-on sensors
- Supports multiple circuits and phases
- Runs locally without cloud or internet dependency
- Supports MQTT and LAN for flexible integration
Cons:
- Requires setup of MQTT server and Home Assistant
- Limited to 240VAC single-phase or 415Y/240VAC three-phase systems
- No included batteries or cloud storage
Best for: Tech-savvy users who want full local control and flexible integration
Not ideal for: Homeowners seeking plug-and-play solutions or no technical setup
Bottom line: A high-precision, customizable monitor best suited for users who value local control and are comfortable with technical configuration.
“A high-precision, customizable monitor best suited for users who value local control and are comfortable with technical configuration.”

Refoss Smart Home Energy Monitor, Native Open API & Web UI (No Cloud Required), Real Time Electricity Usage Monitor, Power Consumption Meter Works with Home Assistant & MQTT, Solar Net Metering, ETL
LOCAL CONTROL & DATA PRIVACY: Access your home energy monitor data locally via Built-in Web UI, Open API,...
As an affiliate, we earn on qualifying purchases.
Refoss Smart Home Energy Monitor with Open API & Web UI
The Refoss Smart Home Energy Monitor emphasizes privacy and customization. Its high accuracy (±1%) and support for local control through Web UI, Open API, and MQTT make it ideal for users who want to avoid cloud dependence. Its seamless integration with Home Assistant and AI automation helps optimize solar energy and reduce bills, all while maintaining data privacy. The device is easy to install with clamp-on sensors and supports two main circuits plus 16 branch sensors. However, setting up APIs and MQTT requires some technical knowledge, which could be a barrier for casual users. Compared with the other options, it offers excellent privacy and flexibility but lacks built-in cloud or subscription services.
Pros:
- Supports local control via Web UI, Open API, MQTT
- High measurement accuracy (±1%)
- Supports integration with Home Assistant and AI automation
- Supports multiple circuits and 16 branch sensors
Cons:
- Requires technical API and MQTT setup
- Limited capacity for circuits (up to 200A main, 60A branch)
- No cloud storage or subscription features
Best for: Technically inclined users focused on privacy and open-source integrations
Not ideal for: Users seeking plug-and-play or minimal setup devices
Bottom line: The perfect choice for privacy-conscious, tech-savvy users who want full control and open-source flexibility in their energy management.
“The perfect choice for privacy-conscious, tech-savvy users who want full control and open-source flexibility in their energy management.”
As an Amazon Associate we earn from qualifying purchases.
Before You Start
Verify compatibility of the energy monitor with your home’s electrical system and Wi-Fi network. Have your Wi-Fi password ready. Confirm the device is compatible with your smartphone’s operating system. Turn off the main power supply if you are unsure about wiring connections.
Step-by-Step Instructions
Step 1: Turn off the main power supply
Locate your home’s main circuit breaker and switch it to the off position to cut power to your electrical panel.
Tip: Double-check with a voltage tester to ensure power is off before proceeding to wiring.
Check: Power is off; no live voltage detected at the panel.
Step 2: Access the electrical panel
Remove the cover of your electrical panel using a screwdriver to expose the wiring terminals.
Tip: Keep track of screws and parts to reassemble easily afterward.
Check: Panel cover removed with clear access to main wiring.
Step 3: Identify the main power feed
Locate the main power feed wires (usually two or three conductors) entering the panel, typically connected to the main breaker.
Tip: Consult your home’s wiring diagram or manual if unsure which wires are the main feed.
Check: Correctly identified the main power wires for installation.
Step 4: Connect the energy monitor clamp or wiring
Attach the clamp or wire leads of the energy monitor around or to the main power wires as specified in the device manual. Secure connections firmly.
Tip: Ensure the clamp is properly closed and wires are tightly connected to prevent loose contact.
Check: Clamp or wires are securely connected without exposed conductors.
Step 5: Reassemble the electrical panel
Replace the panel cover and secure it with screws.
Tip: Ensure no wires are pinched or obstructed before closing.
Check: Panel cover reinstalled securely with no exposed wiring.
Step 6: Restore power and connect to Wi-Fi
Turn the main circuit breaker back on. Wait for the energy monitor to power up, then follow the device’s instructions to connect it to your Wi-Fi network using the smartphone app.
Tip: Ensure your device is within Wi-Fi range. Use 2.4 GHz Wi-Fi if specified by the monitor manual.
Check: Device shows as connected in the app and is transmitting data.
Step 7: Configure the energy monitor in the app
Open the energy monitor app on your smartphone or tablet. Follow the on-screen prompts to create an account or log in. Set your location, and configure any device-specific settings.
Tip: Enable notifications if you want alerts for high energy use or faults.
Check: App displays real-time energy data and reports correctly.
Common Mistakes to Avoid
- Connecting the clamp or wires incorrectly to the main feed — Double-check wiring diagrams and ensure the clamp is around the correct wires; consult professional help if unsure.
- Not turning off power before wiring — Always switch off the main breaker and verify power is off with a voltage tester before touching wiring.
- Using incompatible Wi-Fi networks or signals — Ensure your Wi-Fi is 2.4 GHz if required by the device and that the signal strength is adequate at installation site.
- Poor securing of connections — Tighten all clamps and wires fully, and check for exposed conductors after installation.
Troubleshooting
Problem: Device not transmitting data after setup
Solution: Verify Wi-Fi connection, restart the device, and ensure app permissions are granted. Reinstall the app if necessary.
Problem: Energy readings are inconsistent or zero
Solution: Check all wiring connections, ensure the clamp is properly placed, and confirm the main power is correctly supplied.
Problem: Device shows connection errors or disconnects frequently
Solution: Improve Wi-Fi signal strength, reduce interference, or relocate the device closer to the router if possible.
What Success Looks Like
The energy monitor displays real-time energy usage on your smartphone app, with data updating regularly. You can see your overall household consumption and identify high-use appliances. The device remains connected without errors or disconnections.
Next Steps
Regularly review your energy data to identify savings opportunities. Schedule periodic checks of the device and app updates. Consider integrating the monitor with other smart home systems for automated energy management. If issues arise, consult the manufacturer’s support resources or contact a licensed electrician.
Frequently Asked Questions
Is professional installation required?
While installation is straightforward for those familiar with electrical work, hiring a licensed electrician is recommended for safety and to ensure code compliance.
Can I install the energy monitor myself?
Yes, if you have basic electrical knowledge and experience working with household wiring. Follow all safety precautions and the device manual carefully.
Will the monitor interfere with my electrical system?
No, properly installed energy monitors are designed to be safe and non-intrusive, with no impact on your electrical system’s operation.
Can I use the energy monitor with solar panels?
Some models are compatible with solar setups; check your device specifications and consult the manufacturer if necessary.