
This guide walks you through installing and setting up a smart home energy monitor to track your household’s energy use. Suitable for beginners, it helps you understand your energy consumption, identify savings, and improve efficiency. Completing this task will give you real-time data on energy flow in your home, enabling smarter energy management.

Emporia Vue 3 Home Energy Monitor – Smart Home Automation Module and Real-Time Electricity Usage Monitor
- ✔ Compatibility: Smart Plugs, EV Chargers, Home Battery Systems, 3rd Party Thermostats, Appliances
- ✔ Color: White
- ✔ Item Dimensions: 10 x 5 x 5 inches

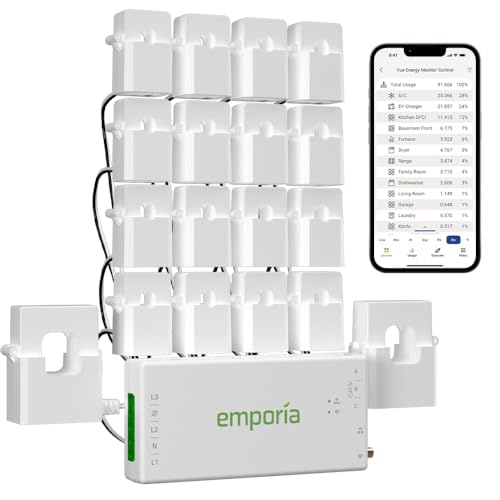
Smart Home Energy Monitor with 16 50A Circuit Sensors, Real-Time Power & Cost Tracking, Compatible with Home Assistant
- ✔ Number of Sensors: 16
- ✔ Sensor Current Rating: 50A
- ✔ Supported Voltages: up to 415Y/240VAC

Refoss Smart Home Energy Monitor with Open API & Web UI
- ✔ Weight: 4.24 pounds
- ✔ Dimensions: 4.5 x 3.5 x 1.1 inches
- ✔ Item Model Number: EM16
Difficulty: Beginner | Time: 30-60 minutes
What You’ll Need
Tools & Materials:
- Screwdriver (Phillips head)
- Drill (optional)
- Smart home energy monitor device
- Mobile device or computer for setup
Knowledge:
- Basic understanding of household electrical panels
- Familiarity with Wi-Fi setup
Ensure your Wi-Fi network is stable and your smartphone or computer is connected before starting. Turn off power to the main electrical panel if handling wires directly.
Emporia Vue 3 Home Energy Monitor - Smart Home Automation Module and Real Time Electricity Usage Monitor, Power Consumption Meter, Solar and Net Metering for UL Certified Safe Energy Monitoring
SAFETY YOU CAN TRUST WITH UL CERTIFICATION: With Emporia Energy, your home energy monitoring is safe, reliable, and...
As an affiliate, we earn on qualifying purchases.
Emporia Vue 3 Home Energy Monitor – Smart Home Automation Module and Real-Time Electricity Usage Monitor
The Emporia Vue 3 stands out for its comprehensive automation capabilities, safety certifications, and support for solar and net metering. It installs directly in your circuit panel, making it suitable for whole-home monitoring. Compared to the other options, it offers more sensors (16), enabling detailed load analysis. Its mobile app allows for automation rules, making it ideal for users who want to integrate energy data into their smart home routines. However, it requires a WiFi connection, and some 3-phase setups need additional sensors, which can complicate installation. This pick makes the most sense for those seeking a robust, safety-certified, and automation-ready system.
Pros:
- UL-certified for safety and reliability
- Supports real-time monitoring and solar/net metering
- Includes 16 sensors for detailed load analysis
- Mobile app supports automation rules
Cons:
- Requires WiFi for real-time data access
- Additional sensors needed for some 3-phase systems
- Limited data retention in app
Best for: Homeowners seeking a reliable, automation-capable energy monitor with solar integration.
Not ideal for: Users who prefer a plug-and-play, no-install solution or lack WiFi infrastructure.
Bottom line: The Emporia Vue 3 is the best all-around choice for those wanting automation, safety, and solar support, with some installation considerations.
“The Emporia Vue 3 is the best all-around choice for those wanting automation, safety, and solar support, with some installation considerations.”

Smart Home Energy Monitor with 16 50A Circuit Level Sensors, Real-Time Power Usage & Electricity Cost Tracking, Ideal for Rental Homes & Shared Apartments, App History, Compatible with Home Assistant
⚡ EASY INSTALLATION: Installs in circuit panel of most homes with clamp-on sensors. Supports single-phase up to 240VAC...
As an affiliate, we earn on qualifying purchases.
Smart Home Energy Monitor with 16 50A Circuit Sensors, Real-Time Power & Cost Tracking, Compatible with Home Assistant
This energy monitor is ideal for users who prioritize local control and privacy. It installs easily with clamp-on sensors on multiple circuits, making it suitable for rental homes, shared apartments, or small commercial setups. Its support for MQTT, LAN, and local data processing means no cloud dependency, which appeals to privacy-conscious users. Compared with the Emporia, it offers similar sensor capacity but with a focus on flexible connectivity options. The main tradeoff is the need for a compatible MQTT server or Home Assistant setup, making it less plug-and-play but more customizable. It’s a strong choice for those who want detailed analytics without sacrificing data privacy.
Pros:
- Easy clamp-on installation
- Supports multiple circuits and phases
- Operates without cloud, ensuring privacy
- Offers detailed energy analytics
Cons:
- Requires MQTT or Home Assistant setup
- Limited to WiFi 2.4GHz networks
- May need additional sensors for busbar access
Best for: DIY enthusiasts who want local control and privacy, especially in multi-circuit setups.
Not ideal for: Users unfamiliar with MQTT or Home Assistant, or those seeking a ready-to-use system.
Bottom line: The Privacy-Focused Energy Monitor is best for tech-savvy users who want detailed control without cloud reliance, but installation complexity may be a barrier.
“The Privacy-Focused Energy Monitor is best for tech-savvy users who want detailed control without cloud reliance, but installation complexity may be a barrier.”

Refoss Smart Home Energy Monitor, Native Open API & Web UI (No Cloud Required), Real Time Electricity Usage Monitor, Power Consumption Meter Works with Home Assistant & MQTT, Solar Net Metering, ETL
LOCAL CONTROL & DATA PRIVACY: Access your home energy monitor data locally via Built-in Web UI, Open API,...
As an affiliate, we earn on qualifying purchases.
Refoss Smart Home Energy Monitor with Open API & Web UI
The Refoss Smart Home Energy Monitor emphasizes local data control with support for Web UI, Open API, and MQTT. It provides high-accuracy monitoring of voltage, current, and power factor, making it suitable for users who want detailed insights and integration with systems like Home Assistant. Unlike the other options, it offers seamless local automation, reducing dependency on internet connectivity. Its ability to handle large circuits up to 200A main and 60A branch makes it flexible for various home sizes. The tradeoff is that installation may require some technical skill, and it does not include batteries or power supplies, adding to setup complexity. It’s best suited for users who prioritize privacy, control, and integration flexibility.
Pros:
- Supports local control via Web UI, Open API, MQTT
- High accuracy for voltage, current, and power factor
- Seamless integration with Home Assistant and automation platforms
- Supports large circuits up to 200A
Cons:
- Installation may be technically complex
- No included power supply or batteries
- Limited to specific circuit sizes
Best for: Advanced users seeking high-precision data and local automation control.
Not ideal for: Beginners or those who prefer plug-and-play solutions without technical setup.
Bottom line: The Refoss Monitor is ideal for tech-savvy users who want high-precision, local control, and flexible integration, with some installation effort required.
“The Refoss Monitor is ideal for tech-savvy users who want high-precision, local control, and flexible integration, with some installation effort required.”
As an Amazon Associate we earn from qualifying purchases.
Before You Start
Read the device manual to understand the specific installation requirements. Confirm your electrical panel is accessible and that you have permission to work with household wiring. If unsure about electrical work, consult a professional electrician.
Step-by-Step Instructions
Step 1: Choose a suitable installation point
Select a location on your main electrical panel or near your breaker box where the monitor can be safely installed. It should be away from moisture, extreme heat, or moving parts.
Tip: Use the device’s mounting bracket or adhesive pad as provided to secure it firmly in place.
Check: The monitor is securely mounted and accessible for wiring and future maintenance.
Step 2: Turn off the main power supply
Switch off the main breaker to cut power to the electrical panel. Confirm power is off using a voltage tester or by attempting to turn on a device connected to the panel.
Tip: Always ensure power is fully off before handling wiring to prevent electric shock.
Check: Power is confirmed off; no electricity flows from the panel.
Step 3: Connect the energy monitor to your electrical panel
Follow the device manual to connect current sensors or clamps around the main power cables inside the panel. Ensure each sensor is correctly placed on the appropriate cable, typically the main feed.
Tip: Double-check the placement of sensors to avoid incorrect readings or damage.
Check: Sensors are securely attached, and wiring is correctly connected per the manual.
Step 4: Restore power and configure the device
Switch the main breaker back on. Use your mobile app or computer to connect to the energy monitor via Wi-Fi or Bluetooth, as specified. Follow the app setup instructions to connect the device to your network.
Tip: Ensure your device is close to the Wi-Fi router during setup for a stable connection.
Check: Device connects successfully and shows initial energy data in the app.
Step 5: Configure energy monitoring settings
Within the app, set your household parameters, such as the number of circuits, energy tariff, and notification preferences. Save your settings.
Tip: Label circuits accurately to identify specific appliances or areas later.
Check: Settings are saved, and the app displays real-time energy consumption data.
Step 6: Test the system
Turn on household appliances and observe the energy monitor app to verify it detects changes in energy use. Confirm that readings update in real time.
Tip: Use different appliances to ensure the monitor detects varying loads.
Check: The app displays accurate, real-time energy consumption corresponding to appliances used.
Common Mistakes to Avoid
- Incorrect sensor placement leading to inaccurate readings. — Follow the manual carefully to position sensors on the main cables properly and securely.
- Forgetting to turn off power before wiring. — Always switch off the main breaker and verify power is off before handling electrical connections.
- Poor Wi-Fi connection during setup causing device failure. — Ensure your Wi-Fi signal is strong and close to the device during initial configuration.
- Not labeling circuits accurately, causing confusion in data analysis. — Label each circuit or sensor during setup for easy identification later.
Troubleshooting
Problem: Device fails to connect to Wi-Fi or app.
Solution: Restart your router and device, ensure the device is within range, and verify Wi-Fi credentials are correct.
Problem: No data appears in the app after setup.
Solution: Check sensor connections, ensure power is on, and re-run the setup process if needed.
Problem: Inconsistent or fluctuating readings.
Solution: Ensure sensors are firmly attached and not loose, and verify electrical connections in the panel.
Problem: Device stops functioning after a firmware update.
Solution: Restart the device, check for updates, and follow the manufacturer’s troubleshooting guide.
What Success Looks Like
The energy monitor displays real-time household energy consumption accurately, updates regularly, and reflects appliance use when turned on or off. The app or device interface should show clear, consistent data matching actual household activity.
Next Steps
Regularly monitor your energy data to identify high-consumption appliances, set energy-saving goals, and consider automation or scheduling. Schedule periodic checks of the device’s connections and firmware updates to maintain accuracy. Consult a professional if electrical wiring or device installation becomes complex or uncertain.
Frequently Asked Questions
Can I install a smart home energy monitor myself?
Yes, if you are comfortable working with household electrical panels and understand basic wiring. For complex connections or if unsure, consult a licensed electrician.
Will installing a smart energy monitor affect my household electrical system?
No, the monitor is designed to be installed externally or on the main panel without disrupting your electrical system when installed correctly.
How often should I calibrate or check the energy monitor?
Follow the manufacturer’s recommendations, typically every 6-12 months, or if you notice inconsistent readings.
Will the device work with my existing Wi-Fi network?
Most monitors are compatible with standard Wi-Fi networks, but check the device specifications to ensure compatibility with your router’s frequency and security settings.