TL;DR
Moving your rig into a closet can drastically cut noise and echo, but it requires proper ventilation and treatment. Combining placement, damping, and sealing creates a quiet, functional space—without high costs or complex construction.
Ever notice how a tiny closet can become your best friend for recording vocals or hosting a quiet AI rig? The secret isn’t just slapping foam on the walls — it’s about smart placement, sealing gaps, and managing heat. You can turn that echo chamber into a soundproofed sanctuary with a few straightforward tweaks, saving money and hassle.
In this guide, you’ll discover why moving your rig to a closet might be your best move, how to keep it cool, and how to treat the space for clearer sound and less noise bleed. Want your voice recordings crisp, your AI rig quiet, and your room peaceful? Let’s dive in.
Acoustic dampening
& the rig in the closet.
The most powerful noise fix isn’t a material — it’s a floor plan. A rig you can’t hear because it’s in another room beats any amount of foam. Tap the approaches in Part 1 to see what actually works.
(another room)
(levers 1–4)
(door / barrier)
(acoustic foam)
Contain the noise, not the heat
Key Takeaways
- Moving your rig into another room is the most effective noise reduction method.
- Proper ventilation is essential when placing a hot, noisy machine in a closet or cabinet.
- Sealing gaps and treating reflection points drastically improve sound quality in small spaces.
- Bass traps and low-frequency treatment prevent muddiness and rumble.
- A balanced approach—treating 20-40% of the space—gives the best mix of absorption and natural sound.

Focusound 52 Pack Acoustic Foam Panels 1" x 12" x 12" Sound Proof Foam Panles Soundproofing Noise Cancelling Wedge Panels for Home Office Recoding Studio with 300PCS Double-Side Adhesive
Soundproofing - Acoustic foam panels triangular grooves structure for better noise absorption, helps to reduce and absorb unwanted...
As an affiliate, we earn on qualifying purchases.
As an affiliate, we earn on qualifying purchases.
Why Moving Your Rig Is the Best Noise Solution You Can Do
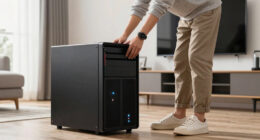
Distance beats damping. The simplest way to cut noise is to put your noisy machine in another room — a closet, basement, or spare corner. When your rig is physically farther away, less sound reaches your ears. This is especially true with AI workstations, which don’t need to be right next to you.
Imagine your AI rig roaring in a closet on the other side of the house while you work peacefully at your desk. That setup does more to quiet your space than any foam panel ever could. Just make sure you have a solid network connection and proper ventilation, and you’re golden.

Audimute Soundproofing Acoustic Door Seal Kit - Door Sweep and Seal - (Standard Size)
Includes a Door Seal (3/16" x 1/2" x 25') and a Door Sweep (1/2" x 1.5" x 4').
As an affiliate, we earn on qualifying purchases.
As an affiliate, we earn on qualifying purchases.
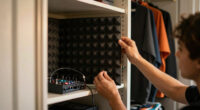
The 'Rig in the Closet' Setup — How to Do It Right
Placing a high-heat, high-noise machine in a closet works wonders — if you handle airflow and heat. A sealed space traps heat, turning your closet into a sauna for your hardware. You can learn more about acoustic dampening and placement techniques. That’s a recipe for throttling, overheating, and loud fans.
To make this work, add ventilation: a passive vent or active exhaust fan. Consider a purpose-built soundproof cabinet with ducted airflow if you want silence and cool running. Keep an eye on the temperature — a simple [liquid cooling system](https://thorstenmeyerai.com/liquid-vs-air-cooling-inference-rig/) can export heat more efficiently.
Remember: ventilation is king. Without it, your rig will cook itself. So, plan for airflow, and never fully seal a hot machine without a cooling strategy.

TroyStudio Portable Vocal Booth, Large Foldable Microphone Isolation Shield, Music Recording Studio Sound Echo Absorbing Box, Desk & Stand Use Reflection Filter with Thickened Dense Acoustic Foam
【BASIC INFO】: Inside size after setup: 8'' (L) X 10'' (W) X 12'' (H), large space for various...
As an affiliate, we earn on qualifying purchases.
As an affiliate, we earn on qualifying purchases.
Acoustic Dampening vs. Soundproofing — What’s the Difference?
Most people confuse dampening with soundproofing — but they’re different. You can find more about dampening vs. soundproofing here. Acoustic dampening (using foam, blankets, or rugs) reduces echo and reflections inside a space. Soundproofing (adding mass, sealing gaps) blocks sound from leaking out or in.
Think of dampening as softening the inside of a room — making it less echoey. Soundproofing is like wrapping the room in a heavy blanket, preventing sound from escaping. Both are useful, but for a closet rig, addressing sound transfer with sealing and decoupling is often more effective than just adding foam.

Dell Latitude 3550 15 15.6" FHD Business AI Laptop Computer, Intel 12-Core Ultra 7 155U (Beat i7-1355U), 16GB DDR5 RAM, 512GB PCIe SSD, WiFi 6, BT 5.3, Backlit KB, Fingerprint Reader, Windows 11 Pro
【Inte Processor】 The Latitude 3550 Laptop is Dell's latest release in the 15" Latitude 3000 family, designed for...
As an affiliate, we earn on qualifying purchases.
As an affiliate, we earn on qualifying purchases.
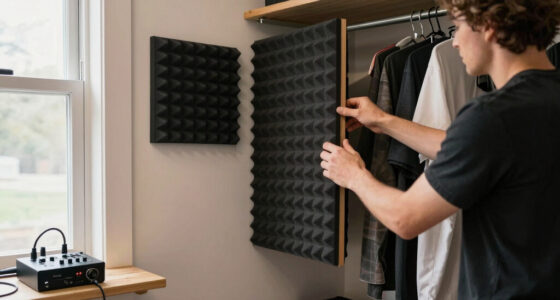
How to Treat a Closet for Better Sound — Step-by-Step
- Seal all gaps: Use weatherstripping around the door, add door sweeps, and seal cracks with acoustic sealant. Proper sealing prevents sound leaks that can undermine your entire setup, making treatments like foam less effective if gaps are present.
- Add absorbent material: Line walls with acoustic panels, bass traps, or even thick blankets to reduce flutter echo. These materials help control sound reflections, but their effectiveness depends on placement and density. Overusing soft materials can deaden the space excessively, reducing natural liveliness.
- Manage low frequencies: Use bass traps or mass-loaded vinyl to tame rumble and standing waves. Low frequencies are the hardest to control because they travel through walls and materials, so targeted treatment here prevents muddiness and boomy recordings.
- Control airflow: Install vents or fans that move heat out without creating noise leak paths. Effective ventilation ensures your hardware stays cool without compromising sound isolation.
- Test and adjust: Play sound, listen for leaks, and add more damping or sealing as needed. Fine-tuning is essential because every closet space has unique acoustic challenges.
Where Should You Place Acoustic Panels in a Closet?
Start by treating the first reflection points: the side walls where sound bounces directly from your mic or speakers. Learn more about placing acoustic panels effectively. Use a mirror trick: have a friend move a mirror along the wall while you sit in your usual spot; the spots where you see the mic or speaker reflections are your first targets.
Next, treat the wall behind your microphone to prevent sound from bouncing back into it. Ceiling panels help reduce vertical reflections, especially in small, square closets. Cover roughly 20-40% of surfaces for a balanced sound without deadening everything.
Proper placement of panels ensures that sound reflections are controlled at their source, preventing buildup of echoes that can muddy your recordings. Balance coverage to maintain natural room acoustics while reducing unwanted reverberation.
Should Bass Traps Go Inside the Closet?
Bass traps are essential if you notice low-end muddiness or rumble. They soak up the deep frequencies that tend to build up in small, enclosed spaces. Installing bass traps in corners or along the wall-floor junction can dramatically improve clarity.
Deep bass frequencies tend to resonate and amplify in confined areas, causing recordings to sound boomy or muddy. Proper placement of bass traps in corners or along junctions where low frequencies accumulate effectively absorbs these problematic sounds, resulting in clearer, more balanced recordings.
Neglecting bass traps can leave your room with a boomy quality, making voice recordings less natural and more difficult to mix. Strategic placement is key to achieving a neutral low end.
How Much of the Closet Should You Cover?
Coverage depends on your goals, but a good rule of thumb is to treat 20-40% of the space — enough to absorb reflections without making the room sound dead. Focus on the first reflection points and the wall behind your mic.
In a small closet, heavier coverage on walls and ceiling often helps more than covering every square inch. Use a mix of panels, blankets, and foam to balance sound control with natural room acoustics. Over-treating can make the space sound unnatural or overly dead, so aim for a balance that maintains some liveliness while reducing problematic reflections.
Will a Reflection Filter Alone Really Help?
A reflection filter can reduce harsh echoes around your mic, but it won’t stop sound from leaking out or vibrating through walls. It’s a good addition for vocal recording but not a substitute for room treatment or sealing.
Using a reflection filter is like putting a shield around your mic—it improves clarity in the immediate vicinity but doesn’t address room-wide issues. For complete noise reduction, combine it with sealing gaps and treating the room’s surfaces. Relying solely on a reflection filter leaves significant sound leaks unaddressed, especially in small, reflective spaces like closets.
What’s the Cheapest Way to Make a Closet Sound Better?
Start with sealing gaps: weatherstripping, door sweeps, and acoustic sealant cost little but make a big difference. Add thick blankets, rugs, or moving pads to reduce echo and bounce. These DIY fixes can cut noise and improve sound quality without breaking the bank.
For example, hanging a thick quilt behind your mic or sealing the door with weatherstripping can cut noise leaks by 50% or more — and cost less than $20. The key is to focus on the most common sound leaks and reflection points, which often yield the biggest improvements for the lowest investment.
How to Stop Sound From Leaking Through the Door
Use door sweeps, weatherstripping, and heavy curtains to block gaps around the door. Hanging a thick blanket or acoustic curtain can further dampen sound escape. For best results, combine multiple methods.
Sealing gaps prevents sound from passing through small openings, which are often the weakest link in sound isolation. Combining door sweeps with heavy curtains creates a barrier that significantly reduces sound leaks, making your space much quieter and more controlled. Remember, even small gaps can undermine your entire setup if not addressed.
Do Rugs, Blankets, or Foam Really Help?
Yes. Thick rugs, blankets, and foam absorb high and mid frequencies, reducing echo and reflections. They’re especially helpful in small, reflective spaces like closets.
Using soft materials like rugs and blankets can dramatically improve sound quality by reducing flutter echo and preventing sound bouncing around the room. Be mindful to use enough material to make a difference but avoid over-damping, which can make the space sound unnaturally dead. Strategic placement of these soft materials enhances clarity and warmth in recordings.
How to Reduce Echo Without Deadening the Space
Use targeted absorption: treat first reflection points and corners, but leave parts of the room open. Mix absorptive panels with some reflective surfaces to keep the sound natural.
This approach maintains a lively room sound while controlling problematic echoes. Over-treating can make your space sound too dull or unnatural, so choose placement carefully. Combining absorption with some reflective surfaces preserves the natural ambiance, which is especially important for vocal recordings or podcasts aiming for warmth and clarity.
Can a Closet Work for Vocals, Podcasts, or Voiceover?
Absolutely. A closet can be an excellent vocal booth if treated properly. Its small size naturally reduces echo, and with some damping, it can sound warm and close-mic friendly.
Many voice actors swear by closet booths — they’re affordable, quick to set up, and effective if you handle reflection and sound leaks. Just remember, for loud sources or full-band recording, a closet alone isn’t enough.
Dealing With HVAC, Vibration, and External Noise
If noise comes from HVAC or vibrations, treatment inside the closet won’t fix it. You need decoupling, isolation pads, or vibration mats. Ducting or duct-mounted silencers can also reduce HVAC noise.
Imagine placing your rig on anti-vibration pads and sealing duct leaks — that’s often more effective than acoustic panels alone. For loud external noise, sealing gaps and adding mass are key.
Frequently Asked Questions
Do I need soundproofing or acoustic treatment?
It depends on your goal. Soundproofing blocks sound from escaping or entering, while acoustic treatment reduces echo and reflections inside the space. For a closet rig, sealing gaps and treating reflection points usually offers the biggest benefit.Where should I place acoustic panels in a closet?
Start with first reflection points—side walls where sound hits directly. Treat the wall behind your mic and ceiling to prevent vertical reflections. Cover roughly 20-40% of surfaces for a balanced sound.Should bass traps go inside the closet?
Yes. Bass traps are crucial if low frequencies cause muddiness or rumble. Place them in corners or along the wall-floor junctions to absorb deep frequencies, especially in small, enclosed spaces.How much of the closet should I cover?
Treat about 20-40% of the surfaces—focusing on reflection points and corners. Over-treating can deaden the sound, so balance absorption with natural room acoustics.Will a reflection filter alone help?
A reflection filter improves clarity around your mic but won’t stop sound leaks or vibrations. It’s a good addition, but for full noise control, combine it with sealing and treatment.Conclusion
Transforming a closet into a quiet, functional workspace isn’t just about slapping foam on the walls. It’s about smart placement, sealing, and managing heat. When done right, your noisy rig becomes a distant hum, and your room turns into a peaceful haven for voice, video, or AI work.
Remember: the best soundproofing is distance and ventilation. Keep your hardware cool, seal leaks, and focus treatment where it counts. Your ears — and neighbors — will thank you.